Tuesday, October 17, 2017

OSB - Rollback transactions in ForEach in case of error

Problem: In a ForEach, there is a service callout to a stored procedure which inserts/updates a row. If during that ForEach, there is an error when inserting/updating one of the rows, the whole transaction has to be rolled back.

Solution: In OSB 12c, go to the SB Console and go to the Pipeline configuration which has the ForEach activity. In Message Handling, under Transaction, select Transaction Required. This will cause for all of the inserts/updates to be rolled back if there is an error during one of them. Also, in our stored procedure, the exception is not handled and is instead re-thrown so that way OSB will catch it.


As a request, I send in 5 IDs. The Stored Procedure is programmed so that on the 5th ID, it should throw an error.


Nothing is inserted in the table after the error.


In our case, the Service Callout is in the response pipeline. Anything that is inserted in the request pipeline will be commited, and so the response pipeline has a different transaction and won't affect the transaction in the request pipeline.

Wednesday, September 13, 2017

OSB - Consuming REST services [Part 1]

In this post I'll talk about using the REST adapter in OSB 12c to consume a sample webservice:
http://jsonplaceholder.typicode.com. This REST API uses JSON format so we will also use the native format wizard to create the XSD.

GET Operation - Template Parameter
We'll start with a GET operation for the following resource:

/posts/1/comments

This involves using a template to specify the post ID. 

First, drag the REST adapter into the External Services lane to open the Create REST binding window. The Base URI is the one mentioned at the beginning of the post.

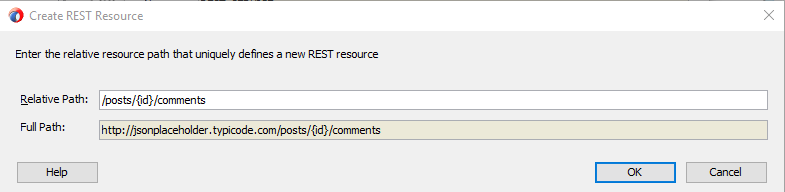
Under the Resources section, click the + icon to add the following Relative Path: /posts/{id}/comments


We add the brackets and a keyword (in this case, id) to specify the parameter in the style of a template according to how the API expects the resource to be formatted.

Next, in the Operation Bindings section, click the green + and choose Add operation binding to open the REST Operation Binding window. Here, specify the name of the Operation (getPosts), and the resource is /posts/{id}/comments. Because this is a GET operation, the HTTP Verb is GET.


In the Response section, check the JSON box and then click on the Define Schema for Native Format icon on the right side. This is where we will define the WSDL for the operation as well as the schema for the JSON format that is returned by the REST API.

In the Native Format Builder window, provide a proper File Name to the schema and click Next. The File Type is JSON Interchange Format, and in the next step we will choose the filename that has a sample on how the API returns the response:


It will generate a Native Format Schema File like so:


In the Request tab, leave as is. In the URI Parameters, it should show the id Parameter from the template that we defined earlier. Once you click OK, the Request and Response tabs should look as follow:

Request

Response

Now that we've defined the REST service to consume, we will expose a SOAP Webservice that takes a string as an input and another string as an output. I'm not really concerned about the output of the proxy webservice since we just want to see that OSB is consuming the REST service properly given a string as a parameter (which will represent the id that it needs to send).


So create a Proxy service with its pipeline using this schema. The OSB project should look like this:


In the Pipeline, add a Route activity and within, a Routing activity. In the Request Action, add a Replace activity. Here we will send the input parameter to the id element that we defined earlier as a template parameter:


Make sure to select Replace node contents instead of Replace entire node. Once done, we can deploy and test in the Service Bus Console!

Sending a 1 as the input parameter should return a list of comments for the post with Id 1:


GET Operation - Query Parameter
In the first part we did an example of sending a GET request using a template. Now we will see how to do a GET request using a query parameter for the following resource:

/comments?postId=1

Right-click the REST adapter and select Edit REST. Under the Resources section, click the + icon to add the following Relative Path: /comments

Next, under Operation Bindings, click Add operation binding. Name the operation getPostsQuery and HTTP Verb as GET. In the Request tab, click the Define schema for Native format to specify that the postId will be one of our query parameters. In the Native Format Builder wizard, choose URI Sample and click Next.

Here, provide the following URL as the sample:
http://jsonplaceholder.typicode.com/comments?postId=1


Click Next twice and then Finish. You'll see that the URI Parameters section has now been updated (the Expression column will update once we click OK):


In the Response tab, use the same NXSD that we built for the previous example since the response will be the same, it's just the request format that is different.

In the pipeline, update the Replace activity accordingly with the updated XML parameters:


Don't forget to also update the operation to getPostsQuery (or whatever you named it) in the Routing activity.

Deploy and test. You should get the same results as in the previous exercise.

And that's it. Super simple to consume a REST JSON service using the REST adapter.

In the next part I'll cover the POST operation. 

Thursday, June 29, 2017

OSB - JMS Custom Properties

To set JMS custom properties to an outbound message, use a Transport Header activity in the Routing activity that calls the JMS outbound adapter:


To obtain JMS custom properties from an inbound JMS request, do the following in an Assign activity:

$inbound/ctx:transport/ctx:request/tp:headers/tp:user-header[@name='WsTo']/@value

...where the "WsTo" value is the Name of the custom property/header set initially in the JMS message.

Thursday, March 23, 2017

OSB - fn-bea:execute-sql in XQuery Transformation

Problem: In an XQuery transformation file, an SQL query needs to be run to transform a date into the acceptable ISO date format to insert it into the database. Unlike the query-database function used in the SOA engine for XSLTs, the fn-bea:execute-sql returns the result enclosed in two XML elements. For example:

fn-bea:execute-sql('jdbc/DataSource',xs:QName('Element'),'select 123 result from DUAL')

Returns the value as such:

<Element>
    <RESULT>123</RESULT>
</Element>

This isn't really helpful when you want to just get the result itself (without surrounded elements) to use it in an XQuery transformation.

Solution:
I had to create a local function that would only return the data (in the above example, return 123). The $input is the SQL query that needs to be run.

declare function local:stringToDate($input as xs:string){
    let $value:=fn-bea:execute-sql('jdbc/DataSource',xs:QName('Element'),$input)
    return fn:data($value/RESULT)
};

In this case, the SQL query I needed to run to transform the string date (e.g. 03/16/17 9:17 PM) into the ISO date format was:

select to_char(to_date('03/16/17 9:17 PM', 'MM/DD/YY HH:MI AM'),'YYYY-MM-DD"T"HH24:MI:SS') from dual;

And then I had call it as such:

<ns2:date>{local:stringToDate(fn:concat('select to_char(to_date(''',$inDate,''',''MM/DD/YY HH:MI AM''),''YYYY-MM-DD&quot;T&quot;HH24:MI:SS'') result from dual'))}</ns2:date>

Thursday, March 2, 2017

Mediator - Instances stay in Running

This is a known bug where Mediator instances stay in running mode. Check the following Oracle Support Document for more information:

Oracle Support Document

To switch from 'Deferred' to 'Immediate' auditing:
1.  Go to EM
2.  Expand 'SOA' on the left
3.  Right click 'soa-infra'
4.  Select 'SOA Administration' -> 'Common Properties'
5.  At the bottom select 'More SOA Infra Advanced Configuration Properties...'
6.  Select 'Audit Config'
7.  Expand 'policies'
8.  Here you'll see 'Element_0' and 'Element_1'
9.  Expand 'Element_1' and change 'isActive' to 'false'
10.  Expand 'Element_0' and change 'isActive' to 'true'
11.  Click 'Apply'

Tuesday, February 28, 2017

OSB - Processing a SOAP inbound attachment

Problem:
A SOAP service returns a XOP/MOTM attachment as a zip file in its response. This must be unzipped to obtain the XML document inside and then write that file to a folder.

Solution:
There are a bunch of blogs already which describe how to retrieve a XOP/MOTM attachment from a web service response, but why not document my process as well.

The Business Service must first be edited so that XOP/MOTM is enabled, which is disabled by default:


There are two options here as to how to handle the attachment. The difference is explained in this blogpost:

Include Binary Data by Reference: (Default) In an outbound response message, replace xop:Include elements with ctx:binary-content elements when setting up the $body message context variable. 
Include Binary Data by Value: In an outbound response message, replace xop:Include elements with Base64-encoded text versions of corresponding binary data when setting up the $body message context variable.

In my case I used Reference since I didn't really have to validate the XML or do anything else with it. This is how the web service would return its response:


So to get the binary-content element and pass it directly to the Java callout as a byte array, you have to select the whole binary-content element like so:

$body/typ:getDocumentsForFilePrefixResponse/*:result/*:Content/*:binary-content


The Java class which takes care of unzipping the file and returning the contents as String can be found in this blog post: An example of how to process a zipped file in OSB by Mike Muller. Putting it here as well for future reference:


To be able to write it to a file, all that's left is to call the encode method in the Java class, passing the result of the first Java callout to this method. This will transform the XML (as string) into base64 which will allow you to invoke the File adapter to write the file.

Monday, January 16, 2017

XQuery - Parsing/syntax validation of a CSV file (number of columns and expected header)

Problem:

When polling/reading a file in CSV format and the file doesn't have the expected number of columns, there are three scenarios that can happen when trying to translate this file into an XML using the Translate to Native Format activity in BPEL:

1) More commas in one of the lines than the number of columns at the header level

With adding extra commas, there is no parsing error to be handled and the file is processed. However, it causes the element right after it to be null, and for the rest of the values to be phased off by one, causing the last element to contain two or more values.

For example, with one extra comma:


With two extra commas:


2) Less commas in one of the lines than the number of columns at the header level 

This gives the following error while reading the file:

Gives following error while polling:

Error while translating.
Translation exception.
Error occured while translating content from file /ftp_read/ftp_folder1/raw_data.csv
Please make sure that the file content conforms to the schema. Make necessary changes to the file content or the schema. 


3) The header (if required) is missing from the file or the column names in the header are in a different order than as expected in the schema.

Solution:

To prevent BPEL from mis-translating these files due to an error in generating these files (and handle these errors more gracefully), you can create an XQuery file that will validate that the header exists (according to a predefined NXSD schema) and check that the number of commas in all of the rows matches that of the header (first row). This has to be done in XQuery since Oracle's XSLT 2.0 implementation doesn't support the replace and tokenize functions used here.

To check that the header exists:

declare function local:header_in_file($sourceInput as element() (:: schema-element(ns1:validationXMLRequest) ::), 
                                      $fileHeader as xs:string) {
     let $header:=$fileHeader
    (: remove anything that isn't a comma or letters/numbers :)
    let $expectedHeader:=replace($header,'[^,A-Za-z0-9]','')
    (: remove the last comma that was added from the transformation earlier :)
    let $expectedHeader:=substring($expectedHeader,1,string-length($expectedHeader) - 1)
    (: get the raw data :)
    let $data:=tokenize(fn:data($sourceInput/ns1:PayLoad), '\n\r?')
    (: obtain the first line from the incoming file, which is supposed to be the header :)
    let $headerInFile:= $data[1]
    (: remove anything that isn't a comma or letters/numbers :)
    let $headerInFile:=replace($headerInFile,'[^,A-Za-z0-9]','')
    let $result:=compare($headerInFile, $expectedHeader)
    where $result !=0
    return 
     <Error>The header in the file does not match the expected header.</Error>
};

To check that the number of commas matches in all the rows:

declare function local:func($sourceInput as element() (:: schema-element(ns1:validationXMLRequest) ::)) as element()* (:: schema-element(ns2:validationReport) ::) {
   
        let $rawdata:=fn:data($sourceInput/ns1:PayLoad)
        (: remove everything except commas, quotations (eg. "LastName, FirstName"), and newline:)
         let $replace:=replace($rawdata,'[^,&quot;\n\r]','')
         (:  remove instances of commas inside quotation marks (e.g. "LastName,FirstName") :)
         let $commasOnly:=replace($replace,'&quot;[,]*&quot;','')
         let $tokenized:=tokenize($commasOnly, '\n\r?')
         let $header:=$tokenized[1]
         let $total:=count($tokenized)
         
         for $row at $pos in $tokenized
         let $rowCommas:=string-length($row)
         let $headerCommas:=string-length($header)
         let $result:=compare($header,$row)
         (:skipping the header and the last array which is an empty line :)
         where $pos != 1 and $pos!= $total and $result != 0
         return 
            <Error>
                    {concat('Row #',$pos, ' does not have the same number of commas as defined in the header. Header commas: ',$headerCommas, ' Row commas: ',$rowCommas)}
            <Error>
};

But how can you dynamically know the header of the file? Simple: using the NXSD schema, you populate a dummy variable based on the NXSD element:


You then manually transform using the following XSLT to a string variable (in this case, $header):

<?xml version="1.0" encoding="windows-1252" ?>
<xsl:stylesheet version="2.0" xmlns:xsl="http://www.w3.org/1999/XSL/Transform"
                xmlns:tns="http://www.test.com/soa/nxsdschema">
  <xsl:output method="text"/>
    <xsl:template match="/">
    <!-- replace the select elements with the corresponding elements in NXSD schema -->
           <xsl:for-each select="//tns:ProbeCompletionDetails/tns:ProbeCompletionDetail/*"> 
        <xsl:value-of select="local-name()"/>,
    </xsl:for-each>
  </xsl:template>  
</xsl:stylesheet>

This outputs in text form the elements of the NXSD schema (which are based on the header) separated by a comma.

And then do an assign activity like the following so that it gets the result as a string:
<assign name="Transform">
<copy><from>ora:processXSLT('Transformations/TransformGetHeader.xsl',$dummyVariable)</from>
        <to>$header</to>
      </copy>
    </assign>

Note: The assign activity HAS to be done using this function and not any other variation (e.g. doXSLTransformForDoc etc.) since otherwise the text output from the XSLT will NOT be properly handled! Also in 12c, with the new folder structure, it is NOT necessary to add the two periods to access the Transformations folder (e.g. ../Transformations/TransformationFile.xsl). Doing so will cause for the XSLT file to not be recognized.

This $header variable is the one that is passed as an argument to the header_in_file function.

And...you're done! You've successfully [dynamically] validated your CSV file before translating it to XML, thus preventing ugly errors/mistranslations from occurring.

Wednesday, December 14, 2016

OSB - Using DVM in 12c using qualifiers

To use a DVM in OSB 12c which requires qualifiers, specify the function as such:

dvm:lookupValue(dvm-location, src-column, src-value, target-column, default-value, qualifiers[])


dvm:lookupValue('DVMQualifiers/Proxy/dvm-cities', 'CityCode', 'KN', 'CityName', 'NA', ('Country','USA'))

Monday, August 8, 2016

SOA - Unable to edit file/jms/db adapter; shows red cross mark

Problem:
Migrated composites to the 12c version are unable to be edited, even with the <?binding.jca dbAdapter_db.jca> fix. The adapter is also showing a red cross mark.

Solution:
The solution is provided in this Oracle community post:

Open .jca file for JMS adapter  and change from  adapter="JMS Adapter" to adapter="jms" . If you use database adapter as well , then change from adapter="Database Adapter" to adapter="db". (  ... adapter="File Adapter" to adapter="file")

The adapter is now able to be edited normally.

Wednesday, July 27, 2016

FYI - JMS Polling and Error Queues

FYI:

When polling a JMS queue in OSB, in order for it to go to the configured error queue, an error must be raised. Raising an error and then handling this error won't cause the message to be sent to the error queue. If the error is handled, then a fault must be raised again.

Take this simple proxy service as an example that polls from a JMS queue configured in weblogic and calls a stored procedure to insert the polled record:


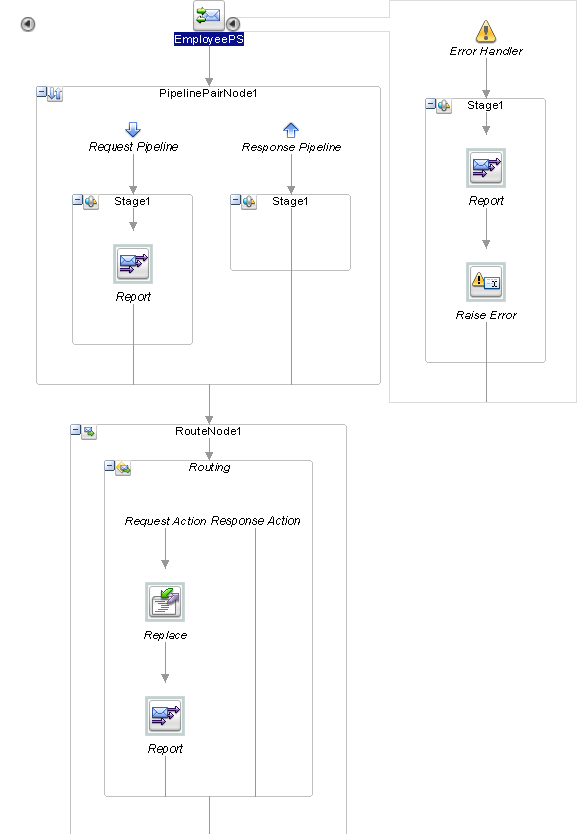
EmployeePS Pipeline:


Should an unexpected error occur somewhere in this pipeline, it will be caught by the error handler. The error will be reported in the EM Message Reports but the error is raised again so that it can be sent to the error queue.

Doing a Reply with Failure will NOT send the message to the error queue. As explained by AbhishekJ here:

In case of JMS transport the JMS Queue or Topic will receive a NACK back but the message will NOT roll back and will be removed from the destination just like in case of Reply with Success. This happens because using a Reply action is considered as an exception being handled properly and a commit will be sent back to the JMS destination. To roll back the message ensure that you use Raise Error instead of a Reply action.

Monday, July 25, 2016

Resources: Helpful Weblogic JMS Links

Creating a JMS Server and Queue in Weblogic:
https://blogs.oracle.com/soaproactive/entry/how_to_create_a_simple

Creating a JMS Error Queue:
http://middlewaremagic.com/weblogic/?p=4670

Tuesday, December 8, 2015

BPEL - FTP Adapter writes XML file without prefix in the root element

Problem:

When writing a file using the FTP adapter with the message schema defined, for some reason the output would come out without a prefix in the root element, like so:


This would happen even with the XSL transformation declaring the prefix in the root element:


I'm not sure if it's a bug or the fact that we have our schema/transformation wrong, but a coworker and I just couldn't get it to work, so we opted for a workaround using Java embedding.

Solution:

We used the following code to add the prefix to the root element by transforming the XML into a string:


 try{   
   oracle.xml.parser.v2.XMLElement responseFile = (oracle.xml.parser.v2.XMLElement)getVariableData("varResponseFile");   
   //setting prefix to root   
   oracle.xml.parser.v2.XMLNode firstChild = (oracle.xml.parser.v2.XMLNode)responseFile.getFirstChild();   
   responseFile.setPrefix(firstChild.getPrefix());   
   //getting xml document   
   oracle.xml.parser.v2.XMLDocument responseFileXML = (oracle.xml.parser.v2.XMLDocument)responseFile.getDocument();   
   //setting prologue   
   responseFileXML.setVersion("1.0");   
   responseFileXML.setEncoding("UTF-8");   
   //writing xml document   
   java.io.ByteArrayOutputStream outputStream = new java.io.ByteArrayOutputStream();   
   responseFileXML.print(outputStream );   
   String responseFileString = outputStream.toString();   
   //encode xml document   
   oracle.soa.common.util.Base64Encoder encoder = new oracle.soa.common.util.Base64Encoder();   
   String stringEnconded = null;   
   stringEnconded = encoder.encode(responseFileString);   
   //setting xml encoded   
   setVariableData("encodedBody",stringEnconded);   
 } catch (Exception e) {   
   addAuditTrailEntry("Error encoding Response File: " + e.getMessage());   
   throw new RuntimeException(e);   
 }  

We would of course change the FTP message schema to opaque instead. Applying this code would then write the XML file correctly:


If anyone knows how to do this without Java (or perhaps what we are doing wrong in the first place), please let us know in the comments!

Tuesday, September 29, 2015

DbAdapter - RowSet Column Type Mismatch Error

Problem: 
Invoking an SQL Server stored procedure with the Db Adapter would return the following error:

JCA Binding execute of Reference operation 'dbGetPromotions' failed due to: RowSet Column Type Mismatch Error. The SQL type in the XSD (INT) does not match the SQL type in the RowSet (int identity) for column ReservationID of parameter RowSet0.

This would happen when the DB Adapter would try to return the Output Parameters for the dbGetPromotions operation.

Solution:
Fix the XSD that was generated during the DB Adapter Wizard.

Originally, the XSD had been generated like this:

  <element name="ReservationID" type="int" db:type="INT" minOccurs="0" nillable="true"/>  

However, apparently the db:type needed for the element ReservationID needed to be int identity, so I changed it as follows:

 <element name="ReservationID" type="int" db:type="INT IDENTITY" minOccurs="0" nillable="true"/>  

Usually the same error will tell you what you need to change the db:type to, so just change it accordingly and you're ready to go!

BPEL - Append multiple elements to a list

Problem: I had a list of XML elements like so:
<Messages> <Message Area="RES" Code="Code1"/> <Message Area="RES" Code="Code2"/> <Message Area="RES" Code="Code3"/> </Message>

This is the XSD:


<xsd:schema xmlns:xsd="http://www.w3.org/2001/XMLSchema" xmlns="http://danytests.com/soa/bpel-append" targetNamespace="http://danytests.com/soa/bpel-append" elementFormDefault="qualified"> <xsd:element name="Messages" type="MessagesType"> <xsd:annotation> <xsd:documentation>A sample element</xsd:documentation> </xsd:annotation> </xsd:element> <xsd:complexType name="MessagesType"> <xsd:sequence> <xsd:element name="Message" maxOccurs="unbounded"> <xsd:complexType> <xsd:attribute name="Area" type="xsd:string"/> <xsd:attribute name="Code" type="xsd:string"/> </xsd:complexType> </xsd:element> </xsd:sequence> </xsd:complexType> </xsd:schema>
What I needed to do was append more items to the already existing list without affecting the ones that were already in there.

At first what I was doing was adding the new items to add to a BPEL variable ($varMessages) that was also of MessagesType. Then, with another variable ($messageCount), I would assign the count of Messages/Message PLUS 1 to it (so, in this case, it would be 4). In a foreach loop, starting with $messageCount, I would do a simple Copy to Messages/Message[$messageCount] and setting the insertMissingToData flag. This, however, isn't really the right way to go about this.

Solution: Use the BPEL Append action instead of the Copy action.

To accomplish this, I would still have the $varMessages variable assigned with the new items to add, but instead my BPEL assign activity would look like this:


<assign name="appendMessages"> <extensionAssignOperation> <bpelx:append> <bpelx:from>$varMessages/ns1:Message</bpelx:from> <bpelx:to>$outputVariable.payload</bpelx:to> </bpelx:append> </extensionAssignOperation> </assign>

That is, I'd assign the Messages from $varMessages to the final list ($outputVariable) in the Messages complexType.

The results were as expected while looking at it in the audit trail. First I'd assign a Message element to the $outputVariable:


Then I'd add elements to $varMessages:


Finally, after the append action, the output variable's final list would look like this:


Neat!

Monday, April 27, 2015

WS Security - Calling a secured Web Service with nonce from BPEL

Problem:

We had to call a secured web service that required a username token to be sent in the SOAP header, but being a WS Security newbie, I bumped into a lot of issues trying to get it to work. After adding the certificate into the SOA Server trust store, I was getting the following error after applying the oracle/wss_username_token_policy:

oracle.j2ee.ws.client.jaxws.JRFSOAPFaultException: Client received SOAP Fault from server : Exception thrown while trying to deserialize the SOAP message
at oracle.j2ee.ws.client.jaxws.DispatchImpl.throwJAXWSSoapFaultException(DispatchImpl.java:1053)
at oracle.j2ee.ws.client.jaxws.DispatchImpl.invoke(DispatchImpl.java:839)
at oracle.j2ee.ws.client.jaxws.OracleDispatchImpl.synchronousInvocationWithRetry(OracleDispatchImpl.java:235)
at oracle.j2ee.ws.client.jaxws.OracleDispatchImpl.invoke(OracleDispatchImpl.java:106)

After reading this very useful post from the AMIS Technology blog, I was able to attach the WS Security header right into the SOAP message which included the Nonce section, like so:

<wsse:Security xmlns:wsse="http://docs.oasis-open.org/wss/2004/01/oasis-200401-wss-wssecurity-secext-1.0.xsd" xmlns:wsu="http://docs.oasis-open.org/wss/2004/01/oasis-200401-wss-wssecurity-utility-1.0.xsd">
   <wsse:UsernameToken xmlns:wsu="http://docs.oasis-open.org/wss/2004/01/oasis-200401-wss-wssecurity-utility-1.0.xsd">
      <wsse:Username>username</wsse:Username>
      <wsse:Password Type="http://docs.oasis-open.org/wss/2004/01/oasis-200401-wss-username-token-profile-1.0#PasswordText">password</wsse:Password>
      <wsse:Nonce>Gt0q/QzAnQn/KMzhXYgR8Q==</wsse:Nonce>
   </wsse:UsernameToken>
</wsse:Security>

The call to the web service would now complete successfully since the original policy does not include the nonce, but this isn't the best way to do it since it's hardcoded into the BPEL process and it's just not very dynamic. The other, better way to do it is by using the OWSM policies and the credential store. I won't go too much into detail on how to setup the keystore and the credential store (I will do a follow-up post on this later on), but I will explain how I managed to send a nonce in the header using the policies, which...isn't really that hard at all!

Solution:

1) Go to the Oracle Enterprise Manager.

2) Under the farm name, expand the Weblogic Domain folder and right-click on the name of your domain, then select WebServices -> Policies.


3) Filter the policies by Service Clients and scroll down until you find one called oracle/wss_username_token_policy. This is the policy I attached on the webservice I had to call, but by default, this policy does NOT include the Nonce. Select it and click at the top "Create Like". I created a copy of this policy so I wouldn't mess with the original.

4) Give your policy a name (I named mine oracle/wss_username_token_nonce_policy) and then scroll down to the area that says "Assertions", Under the Settings tab, click "Show Advanced Fields":

5) Check the box that says "Nonce Required" and save your new policy. My web service only required the nonce, but if yours also needs a creation time, then go ahead and click that, too.


6) Now go to your composite, and below the composite name click SOA Composite -> Service/Reference Properties -> Web Service that you are calling


7) Here, click the Policies tab, then under Directly Attached Policies, click Attach/Detach.


8) Look for your new policy, click Attach, then OK.

9) Your policy should now appear under Directly Attached Policies. If you click on it, its information will be displayed under Security Configuration Details, including the csf-key. These are the credentials that the web service sends for the Username and Password. They can be configured in the Credential Store. In my case, since I had configured the basic.credentials with the username and password that the web service required, there was no need to override this value so the Current Value is left as blank.


When I tried the Web Service again, the policy did the same job as manually adding the SOAP header and the composite completed successfully! :)

Wednesday, April 8, 2015

XSLT - carriage return not working for text output

Problem:

When deploying an XSLT, the carriage return or line feed for text output would not show up when looking at the style sheet in the MDS repository. This was how I was trying to do the carriage returns:

<xsl:text>&#xd;</xsl:text>
<!-- OR -->
<xsl:variable name='newline'><xsl:text>
</xsl:text></xsl:variable> 

But when I would look at the XSLT in the MDS Repository, it would ignore the line breaks and just close the <xsl:text/> tags:

<xsl:text/>
<xsl:variable name="newline">
<xsl:text/>
</xsl:variable> 

Solution:

I ended up having to do it with a variable like so:

<xsl:variable name="newline" select="'&#xD;&#xA;'" /> 

This would show up correctly in the MDS repository and the text output would give the expected result.