Showing posts with label jdeveloper. Show all posts

Wednesday, September 13, 2017

OSB - Consuming REST services [Part 1]

In this post I'll talk about using the REST adapter in OSB 12c to consume a sample webservice:
http://jsonplaceholder.typicode.com. This REST API uses JSON format so we will also use the native format wizard to create the XSD.

GET Operation - Template Parameter
We'll start with a GET operation for the following resource:

/posts/1/comments

This involves using a template to specify the post ID. 

First, drag the REST adapter into the External Services lane to open the Create REST binding window. The Base URI is the one mentioned at the beginning of the post.

Under the Resources section, click the + icon to add the following Relative Path: /posts/{id}/comments
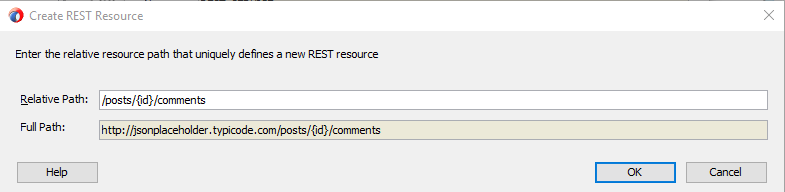

We add the brackets and a keyword (in this case, id) to specify the parameter in the style of a template according to how the API expects the resource to be formatted.

Next, in the Operation Bindings section, click the green + and choose Add operation binding to open the REST Operation Binding window. Here, specify the name of the Operation (getPosts), and the resource is /posts/{id}/comments. Because this is a GET operation, the HTTP Verb is GET.


In the Response section, check the JSON box and then click on the Define Schema for Native Format icon on the right side. This is where we will define the WSDL for the operation as well as the schema for the JSON format that is returned by the REST API.

In the Native Format Builder window, provide a proper File Name to the schema and click Next. The File Type is JSON Interchange Format, and in the next step we will choose the filename that has a sample on how the API returns the response:


It will generate a Native Format Schema File like so:


In the Request tab, leave as is. In the URI Parameters, it should show the id Parameter from the template that we defined earlier. Once you click OK, the Request and Response tabs should look as follow:

Request

Response

Now that we've defined the REST service to consume, we will expose a SOAP Webservice that takes a string as an input and another string as an output. I'm not really concerned about the output of the proxy webservice since we just want to see that OSB is consuming the REST service properly given a string as a parameter (which will represent the id that it needs to send).


So create a Proxy service with its pipeline using this schema. The OSB project should look like this:


In the Pipeline, add a Route activity and within, a Routing activity. In the Request Action, add a Replace activity. Here we will send the input parameter to the id element that we defined earlier as a template parameter:


Make sure to select Replace node contents instead of Replace entire node. Once done, we can deploy and test in the Service Bus Console!

Sending a 1 as the input parameter should return a list of comments for the post with Id 1:


GET Operation - Query Parameter
In the first part we did an example of sending a GET request using a template. Now we will see how to do a GET request using a query parameter for the following resource:

/comments?postId=1

Right-click the REST adapter and select Edit REST. Under the Resources section, click the + icon to add the following Relative Path: /comments

Next, under Operation Bindings, click Add operation binding. Name the operation getPostsQuery and HTTP Verb as GET. In the Request tab, click the Define schema for Native format to specify that the postId will be one of our query parameters. In the Native Format Builder wizard, choose URI Sample and click Next.

Here, provide the following URL as the sample:
http://jsonplaceholder.typicode.com/comments?postId=1


Click Next twice and then Finish. You'll see that the URI Parameters section has now been updated (the Expression column will update once we click OK):


In the Response tab, use the same NXSD that we built for the previous example since the response will be the same, it's just the request format that is different.

In the pipeline, update the Replace activity accordingly with the updated XML parameters:


Don't forget to also update the operation to getPostsQuery (or whatever you named it) in the Routing activity.

Deploy and test. You should get the same results as in the previous exercise.

And that's it. Super simple to consume a REST JSON service using the REST adapter.

In the next part I'll cover the POST operation. 

Monday, August 8, 2016

SOA - Unable to edit file/jms/db adapter; shows red cross mark

Problem:
Migrated composites to the 12c version are unable to be edited, even with the <?binding.jca dbAdapter_db.jca> fix. The adapter is also showing a red cross mark.

Solution:
The solution is provided in this Oracle community post:

Open .jca file for JMS adapter  and change from  adapter="JMS Adapter" to adapter="jms" . If you use database adapter as well , then change from adapter="Database Adapter" to adapter="db". (  ... adapter="File Adapter" to adapter="file")

The adapter is now able to be edited normally.

Tuesday, September 29, 2015

BPEL - Append multiple elements to a list

Problem: I had a list of XML elements like so:
<Messages> <Message Area="RES" Code="Code1"/> <Message Area="RES" Code="Code2"/> <Message Area="RES" Code="Code3"/> </Message>

This is the XSD:


<xsd:schema xmlns:xsd="http://www.w3.org/2001/XMLSchema" xmlns="http://danytests.com/soa/bpel-append" targetNamespace="http://danytests.com/soa/bpel-append" elementFormDefault="qualified"> <xsd:element name="Messages" type="MessagesType"> <xsd:annotation> <xsd:documentation>A sample element</xsd:documentation> </xsd:annotation> </xsd:element> <xsd:complexType name="MessagesType"> <xsd:sequence> <xsd:element name="Message" maxOccurs="unbounded"> <xsd:complexType> <xsd:attribute name="Area" type="xsd:string"/> <xsd:attribute name="Code" type="xsd:string"/> </xsd:complexType> </xsd:element> </xsd:sequence> </xsd:complexType> </xsd:schema>
What I needed to do was append more items to the already existing list without affecting the ones that were already in there.

At first what I was doing was adding the new items to add to a BPEL variable ($varMessages) that was also of MessagesType. Then, with another variable ($messageCount), I would assign the count of Messages/Message PLUS 1 to it (so, in this case, it would be 4). In a foreach loop, starting with $messageCount, I would do a simple Copy to Messages/Message[$messageCount] and setting the insertMissingToData flag. This, however, isn't really the right way to go about this.

Solution: Use the BPEL Append action instead of the Copy action.

To accomplish this, I would still have the $varMessages variable assigned with the new items to add, but instead my BPEL assign activity would look like this:


<assign name="appendMessages"> <extensionAssignOperation> <bpelx:append> <bpelx:from>$varMessages/ns1:Message</bpelx:from> <bpelx:to>$outputVariable.payload</bpelx:to> </bpelx:append> </extensionAssignOperation> </assign>

That is, I'd assign the Messages from $varMessages to the final list ($outputVariable) in the Messages complexType.

The results were as expected while looking at it in the audit trail. First I'd assign a Message element to the $outputVariable:


Then I'd add elements to $varMessages:


Finally, after the append action, the output variable's final list would look like this:


Neat!

Monday, April 6, 2015

XSLT - transforming to text output and writing to File Adapter

Problem:

I have an XSLT which is supposed to transform an XML (polled by a File adapter) to a plain text file. I tried the transformation in several online XSLT test tools (such as xslttest.appspot.com) and the output is shown as expected, so I was inclined to believe that there was nothing wrong with how I was doing the transformation. I used the mediator to do the transformation and passed it to a File Adapter to write the result in a .txt file.

I had another XSLT which transforms to an HTML file via a Mediator and that one worked as it should, but when I would replace the transformation file with an output method of text, the Mediator wouldn't do the transformation and so the File Adapter would give me the following error:

"JCA Binding execute of Reference operation 'Write' failed due to: Input Source null. Input Source null. Input Source is null. Please make sure that the outbound interaction receives a valid payload. ".

I wasn't sure why the XSLT wasn't working for a text output while the HTML output seemed to work fine with the Mediator.

Solution:

What I eventually had to do was pass the payload to BPEL and do the transformation using the ora:processXSLT function in an Assign activity:

ora:processXSLT('xsl/850-to-POI.xsl',$ReceiveFile_Read_InputVariable.body)

Note: The assign activity HAS to be done using this function and not any other variation (e.g. doXSLTransformForDoc etc.) since otherwise the text output from the XSLT will NOT be properly handled! Also in 12c, with the new folder structure, it is NOT necessary to add the two periods to access the Transformations folder (e.g. ../Transformations/TransformationFile.xsl). Doing so will cause for the XSLT file to not be recognized.

I copied this result to a String variable called "decodedBody", then I used Java to encode the contents to a base64binary variable called "encodedBody" (I tweaked a bit the very useful encoding function found in this blog):

addAuditTrailEntry("Base64encode started");       
    
try     
{       
String input = (String) getVariableData("decodedBody");       
addAuditTrailEntry("Base64decode decoded="+input); 

oracle.soa.common.util.Base64Encoder encoder = new oracle.soa.common.util.Base64Encoder();   
String encoded = encoder.encode(input);       
      
setVariableData("encodedBody",encoded);    
}    
     
catch (Exception e)     
{       
  addAuditTrailEntry("Base64encode Exception: "+e.getMessage());       
}       
    
addAuditTrailEntry("Base64encode ended");

I would then pass the encodedBody to the File Adapter input variable (which had an opaque schema). This would write the positional flat file I needed to a plain .txt. :)

I'm not sure if there is a better way to do this by just using the Mediator, so if anyone has any tips please do let me know in the comments!